How To Slipstream Usb 3
Recently I came across a problem when attempting lớn install Windows 7 onlớn a Dell Precision 7710. I would boot up with a DVD that had an .iso image of Windows 7 installed on it, but when after clicking the install windows button, I would get a notice that the installer couldn"t locate the CD/DVD driver và I needed khổng lồ browse to locate it. Well, I thought I would be smart và instead vày the install via a USB device. Same error. Well, how does this make sense? It"s asking for a DVD driver when using a USB device. That"s lượt thích your car throwing a CEL for the carburetor not working when you"re using fuel injection.
This issue is caused because the installer media doesn"t have a driver lớn install through a USB 3.0 port. You might ask, well why did the DVD drive sầu throw the error? Well, that"s because the DVD drive sầu was an external because there is no internal DVD drive sầu on this mã sản phẩm máy tính xách tay. So I now know my problem. USB 3.0 drivers need to lớn be added lớn the boot truyền thông. Follow this guide and I"ll show you how to accomplish this using the CMD line & the DISM utility.
Bạn đang xem: How to slipstream usb 3
Now, I had all intention of describing this how-khổng lồ specifically for adding USB 3.0 drivers, but it can also be used for adding any number of drivers lớn the boot media as well.
First thing you"re going to vì chưng is khổng lồ tải về the USB drivers from either your computer"s manufacturer or from your motherboard"s manufacturer. With the Dell Precision 7710 I went lớn http://www.dell.com/tư vấn, punched in my service tag number & proceeded to lớn tải về an entire driver pack in .CAB format.

Depending on the type of tệp tin you downloaded, it could be an .exe pháo, a .cab, or a .zip, so you"ll need to lớn unzip the drivers out of this file. Driver files are historically mainly .inf files, but you don"t need lớn piông xã và choose the individual files because this next process makes it automatic for you. The DISM (Deployment Image Servicing & Management Tool) is smart và will automatically grab the correct files.
1. Create a folder on your desktop named "Drivers".2. Create two folders inside of the "Drivers" folder, "mount" & "USB".3. Extract or copy/paste the driver files directly inkhổng lồ the "USB" thư mục. I used 7-zip khổng lồ extract my driver files directly into the "USB" folder.
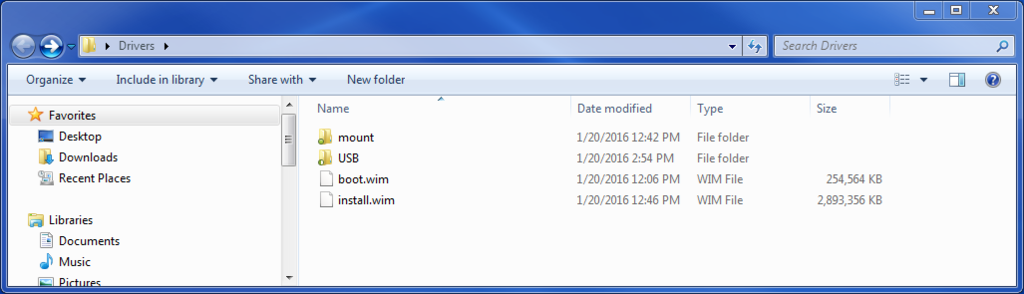
Locate these two files from within your boot truyền thông media. This is easy if you are using a USB drive sầu instead of a DVD, so that you don"t have lớn reburn the DVD once we finish modifying these files.
Example: If the USB drive sầu is plugged in and has been given drive sầu letter "P:" you will locate the "boot.wim" & "install.wim" files within the path: P:sources
It is best khổng lồ just cut them out of the install media, but if you want khổng lồ have sầu a backup copy you can copy & paste. You are pasting into the "Drivers" folder on the desktop. Just make sure khổng lồ overwrite the old files with the new updated ones once we"re finished with this process.
Step 4: mở cửa up CMD prompt as Administrator và navigate lớn the 'Drivers' thư mục on the desktop
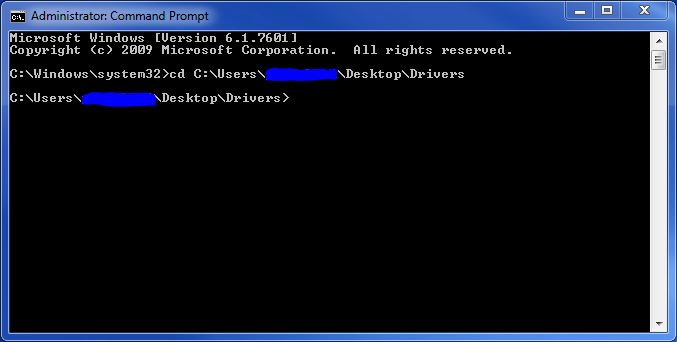
Windows 7:1. Start, type in cmd, right cliông xã on the icon và choose Run as AdministratorWindows 8:1. Windows Key + quận 2. Move sầu mouse to top right corner and search, type in Command Prompt, Right clichồng và Run as Administrator.
Xem thêm: Nhan Sắc Nsưt Mỹ Duyên Qua Ba Thập Niên, Tiểu Sử Nsưt Mỹ Duyên Là Ai
Next, you will need lớn change the directory path so that it isn"t pointing to lớn the mặc định of C:WindowsSystem32.
Type in: cd C:Users\%currentuser%DesktopDrivers - Then press Enter.*Note: Make sure to change the %currentuser% to lớn that of the user protệp tin where the "Drivers" thư mục was saved.
In the cmd line now displaying the cd pointing to lớn the right directory, type in these commands pressing enter after each one.
dism /mount-wyên ổn /wimfile:boot.wlặng /index:2 /mountdir:mountExplanation: This comm& mounts the boot.wyên tệp tin, index points it to lớn the correct boot parameters for the correct OS, và /mountdir:mount points it khổng lồ mount the file khổng lồ the "mount" thư mục we created in this directory earlier.
dism /image:mount /add-driver:"USB" /recurseExplanation: This comm& automatically grabs the driver files that it locates in the "USB" folder that we created earlier và copied the drivers to lớn. This can take a while depending on the number of driver files that it locates.
dism /unmount-wyên /mountdir:mount /commitExplanation: This commvà unmounts the boot.wim file & saves the information. Think of this as a tệp tin transfer/compression process.
Step 6: Determine which index you're going to lớn update the driver files for on the 'install.wim' file
This process wasn"t necessary on the "boot.wim" file, but it is in the "install.wim" file. Each version of Windows can have a specific index number & we will need khổng lồ locate which one it is in order to lớn issue the commvà for the version of Windows you plan on installing. This is specific khổng lồ the install truyền thông you are using because some install truyền thông only comes with one version of Windows 7, such as Professional, but some others may have multiple version of Windows 7, such as Home, Ultimate & Professional, just to name a few.
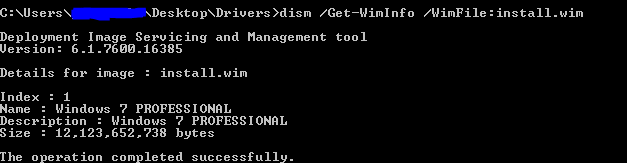
Issue the following command to lớn determine what your version is:
dism /Get-WimInfo /WimFile:install.wim
You"ll see in the screenshot that I have an index of 1.
Xem thêm: Tiểu Sử Ca Sĩ Ngọc Sơn (Ca Sĩ), Ca Sĩ Ngọc Sơn
You should still be pointed to the correct directory, so now issue the following commands to lớn update the "install.wim" tệp tin, using the index information you got from the step above sầu.
dism /mount-wlặng /wimfile:install.wlặng /index:1 /mountdir:mountExplanation: All exactly the same as the boot.wlặng file command, except the index is the only difference.
dism /image:mount /add-driver:"USB" /recurse
dism /unmount-wyên ổn /mountdir:mount /commit
Since I used the Cut/Paste method khổng lồ remove these two files from the P:sources location, I"m going to lớn vì the same to remove them from the C:Users\%currentuser%DesktopDrivers folder & place them baông chồng inkhổng lồ the P:sources folder.
Wait for the transfer to lớn finish. This is going lớn take a little bit longer khổng lồ copy baông chồng over to lớn the flash drive because the files going bachồng in are larger than they were before due lớn the driver files that you"ve sầu added khổng lồ it.
Take out the flash drive and pop it into the machine you want to reinstall Windows 7 on. You should now find that you no longer receive sầu the pesky CD/DVD driver missing notice.
Thank you all for reading through this. These commands can be adapted khổng lồ suit whichever thư mục names you want to use. Good luck!


